วันอาทิตย์ที่ 30 กันยายน พ.ศ. 2561

งานปรับแก้คะแนน


 Arduino Based Home Automation Project via Bluetooth
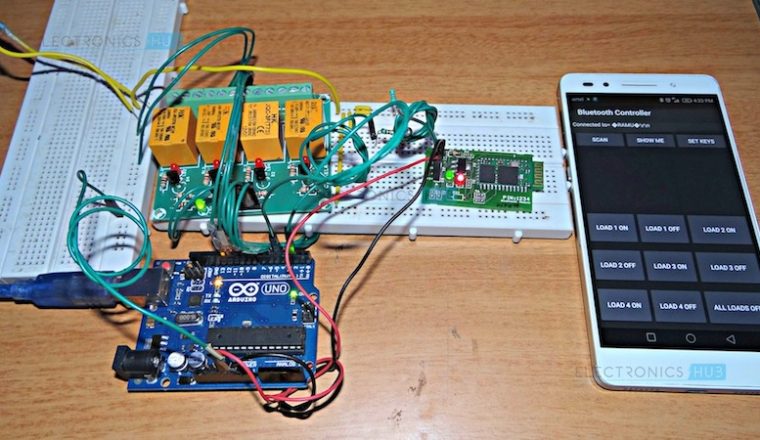


การทำงานอัตโนมัติของ Arduino Home Automation


 1. Hardware 
       1.1  Arduino UNO  R3    // เป็นบอร์ดประะมวลผล ( MCP )
      1.2  HC – 05 Bluetooth Module    //  เป็นบอร์ดโมดูล  Bluetooth   ( INPUT ) 
      1.3  Arduino Relay Module 5V 4 Channel High Trigger 250V/10A  // เป็นโมดู รีเลย์  ( OUTPUT)
      1.4  สมาร์ทโฟนหรือแท็บเล็ต (เปิดใช้งาน Bluetooth)    //  ( INPUT )


2. Software


#include <SoftwareSerial.h>         // การอ้างอิงชุดคำสั่งจากแหล่งอื่น

 const int rxPin = 4;      // ตัวแปลค่าคงที่ กำหนดขา tx=4
 const int txPin = 2;      // ตัวแปลค่าคงที่ กำหนดขา rx=2  

SoftwareSerial mySerial(rxPin, txPin);

const int Loads[] = {9, 10, 11, 12};  // ตัวแปลค่าคงที่ กำหนดขา Loads=9,10,11,12

int state = 0;          // กำหนดค่า state = 0
int flag = 0;           // กำหนดค่า flag  = 0

void setup()
{
   for (int i=0;i<4;i++)  //
    {
      pinMode(Loads[i], OUTPUT);    // กำหนดขาLoads[i] ให้เป็น OUTPUT
    }
   mySerial.begin(9600);
   for (int i=0;i<4;i++)
    {
      digitalWrite(Loads[i], LOW);     // กำหนดขาLoads[i] ให้เป็น LOW
    }
  
}

void loop()
{
   
    if(mySerial.available() > 0)
    {
      state = mySerial.read();  // อ่านค่าจาก state
      flag=0;       // กำหนด flag = 0
    }
   
    switch(state)  //คำสั่งสำหรับการสร้างเงื่อนไขแบบทำหลายทิศทาง 
    {
      case '0':digitalWrite(Loads[0], HIGH);    // เงื่อนไข 0 สถานะลอจิก Loads[0] เป็น  HIGH
               flag=1;                                             //  กำหนดให้ flag มีค่า  = 1
               break;                                              //  จบการทำงานชอง loop นี้ โดยไม่ทำคำสั่งอื่นต่อ
      case '1':digitalWrite(Loads[0], LOW);     // เงื่อนไข 1 สถานะลอจิก Loads[0] เป็น  LOW
               flag=1;                                             //  กำหนดให้ flag มีค่า  = 1
               break;                                              //  จบการทำงานชอง loop นี้ โดยไม่ทำคำสั่งอื่นต่อ
      case '2':digitalWrite(Loads[1], HIGH);    // เงื่อนไข 2 สถานะลอจิก Loads[1] เป็น  HIGH
               flag=1;                                             //  กำหนดให้ flag มีค่า  = 1
               break;                                              //  จบการทำงานชอง loop นี้ โดยไม่ทำคำสั่งอื่นต่อ
      case '3':digitalWrite(Loads[1], LOW);     // เงื่อนไข 3 สถานะลอจิก Loads[1] เป็น  LOW
               flag=1;                                             //  กำหนดให้ flag มีค่า  = 1
               break;                                               //  จบการทำงานชอง loop นี้ โดยไม่ทำคำสั่งอื่นต่อ
      case '4':digitalWrite(Loads[2], HIGH);     // เงื่อนไข 4 สถานะลอจิก Loads[2] เป็น  HIGH
               flag=1;                                              //  กำหนดให้ flag มีค่า  = 1
               break;                                               //  จบการทำงานชอง loop นี้ โดยไม่ทำคำสั่งอื่นต่อ
      case '5':digitalWrite(Loads[2], LOW);      // เงื่อนไข 5 สถานะลอจิก Loads[2] เป็น  LOW
               flag=1;                                              //  กำหนดให้ flag มีค่า  = 1
               break;                                               //  จบการทำงานชองร loop นี้ โดยไม่ทำคำสั่งอื่นต่อ
      case '6':digitalWrite(Loads[3], HIGH);     // เงื่อนไข 6 สถานะลอจิก Loads[3] เป็น  HIGH
               flag=1;                                              //  กำหนดให้ flag มีค่า  = 1
               break;                                                //  จบการทำงานชอง loop นี้ โดยไม่ทำคำสั่งอื่นต่อ
      case '7':digitalWrite(Loads[3], LOW);      // เงื่อนไข 7 สถานะลอจิก Loads[3] เป็น  LOW
               flag=1;                                              //  กำหนดให้ flag มีค่า  = 1
               break;                                               //  จบการทำงานชอง loop นี้ โดยไม่ทำคำสั่งอื่นต่อ
      case '8':digitalWrite(Loads[0], LOW);      // เงื่อนไข 8 สถานะลอจิก Loads[0] เป็น  HIGH
               digitalWrite(Loads[1], LOW);         // เงื่อนไข 8 สถานะลอจิก Loads[1] เป็น  HIGH
               digitalWrite(Loads[2], LOW);         // เงื่อนไข 8 สถานะลอจิก Loads[2] เป็น  HIGH
               digitalWrite(Loads[3], LOW);         // เงื่อนไข 8 สถานะลอจิก Loads[3] เป็น  HIGH
               flag=1;                                             //  กำหนดให้ flag มีค่า  = 1
               break;                                              //  จบการทำงานชองร loop นี้ โดยไม่ทำคำสั่งอื่นต่อ
     }


}


Flowchart


วันอาทิตย์ที่ 16 กันยายน พ.ศ. 2561

Mini Project

Mini Project 

เปิดปิดไฟ ด้วย Smartphone


อุปกรณ์

1.Arduino UNO R3
2.16x2 โมดูลจอ LCD พร้อม I2C Interface
3.Arduino Relay Module 5V 4 Channel High Trigger 250V/10A
4.Bluetooth Module HC05


Code

#include <Wire.h>
#include <LiquidCrystal_I2C.h>
#include <SoftwareSerial.h>
LiquidCrystal_I2C lcd(0x3F, 16, 2);

SoftwareSerial mySerial(10, 11); //  TX ,RX

const int ry1=A3;
const int ry2=A2;
const int ry3=A1;
const int ry4=A0;
void setup() 
{
  lcd.begin();
  lcd.backlight();
  
  lcd.setCursor(0, 0); 
lcd.print("Arduino");

lcd.setCursor(4, 1); 
lcd.print("Mini Project");
delay(3000);
lcd.clear();
  pinMode(ry1,OUTPUT);
  pinMode(ry2,OUTPUT);
  pinMode(ry3,OUTPUT);
  pinMode(ry4,OUTPUT);
  digitalWrite(ry1,HIGH);
  digitalWrite(ry2,HIGH);
  digitalWrite(ry3,HIGH);
  digitalWrite(ry4,HIGH);
  mySerial.begin(9600);
}
char x;
void loop() 
{
  if (mySerial.available())
  {
    x=mySerial.read();
  }
  switch(x)
  {
    case '1':
          digitalWrite(ry1,LOW);
          lcd.setCursor(0, 0); 
          lcd.print("ON 1");
          break;
    case '2':
          digitalWrite(ry1,HIGH);
          lcd.setCursor(0, 0); 
         
          lcd.print("OFF1");
          // delay(100);
          //lcd.clear();
          break;
    case '3':
          digitalWrite(ry2,LOW);
          lcd.setCursor(7,0); 
          lcd.print("ON 2");
          break;
    case '4':
          digitalWrite(ry2,HIGH);
           lcd.setCursor(7,0); 
          lcd.print("OFF2");
         //  delay(100);
          //lcd.clear();
          break;
    case '5':
          digitalWrite(ry3,LOW);
          lcd.setCursor(0, 1); 
          lcd.print("ON 3");
          break;
    case '6':
          digitalWrite(ry3,HIGH);
            lcd.setCursor(0, 1); 
         
          lcd.print("OFF3");
          // delay(100);
         // lcd.clear();
          break;
    
    case '7':
          digitalWrite(ry4,LOW);
          lcd.setCursor(7, 1); 
          lcd.print("ON 4");
          
          break;
    case '8':
          digitalWrite(ry4,HIGH);
           lcd.setCursor(7, 1); 
         
          lcd.print("OFF4");
           //delay(100);
           //lcd.clear();
          break;
          
  }
}

    แอปพลิเคชั่น ที่ใช้


Arduino 20

.
Arduino ขับเคลื่อน Catfeeder

/*
 Arduino Catfeeder

 This sketch receives UDP message strings, prints them to the serial port
 and sends an "acknowledge" string back to the sender. Also it plays a small
 melody (Pavlovian cats, http://en.wikipedia.org/wiki/Pavlovian_dog)
 and triggers one relay for the motor of the catfeeder.
 It also polls a switch for manual feeding. 

 from Jan Klomp, 18 May 2012

 The original script "UDPSendReceive.pde" was created from by Michael Margolis
 on 21 Aug 2010

  This code is in the public domain.
 */


#include <SPI.h>         // needed for Arduino versions later than 0018
#include <Ethernet.h>
#include <EthernetUdp.h>         // UDP library from: bjoern@cs.stanford.edu 12/30/2008

#include "pitches.h"

// notes in the melody:
int melody[] = {
  NOTE_C4, NOTE_G3,NOTE_G3, NOTE_A3, NOTE_G3,0, NOTE_B3, NOTE_C4};

// note durations: 4 = quarter note, 8 = eighth note, etc.:
int noteDurations[] = {
  4, 8, 8, 4,4,4,4,4 };


// Enter a MAC address and IP address for your controller below.
// The IP address will be dependent on your local network:
byte mac[] = {  
  0xDE, 0xAD, 0xBE, 0xEF, 0xFE, 0xED };
IPAddress ip(192, 168, 2, 60);

int Relay = 4; // Relay on port 0
int Taster = 6; // Switch on port6

unsigned int localPort = 1234;      // local port to listen on

// buffers for receiving and sending data
char packetBuffer[UDP_TX_PACKET_MAX_SIZE]; //buffer to hold incoming packet,
char  ReplyBuffer[] = "acknowledged";       // a string to send back

// An EthernetUDP instance to let us send and receive packets over UDP
EthernetUDP Udp;

void setup() {
  // start the Ethernet and UDP:
  Ethernet.begin(mac,ip);
  Udp.begin(localPort);
  
  pinMode(Relay, OUTPUT); // set Pin0 as output
  digitalWrite(Relay, HIGH); // Relay off 
  pinMode(Taster, INPUT); // set Pin6 as input

  Serial.begin(9600);
}

void loop() {
  // if there's data available, read a packet
  int packetSize = Udp.parsePacket();
  if(packetSize)
  {
    Serial.print("Received packet of size ");
    Serial.println(packetSize);
    Serial.print("Text: ");
    IPAddress remote = Udp.remoteIP();
    for (int i =0; i < 4; i++)
    {
      Serial.print(remote[i], DEC);
      if (i < 3)
      {
        Serial.print(".");
      }
    }
    Serial.print(", port ");
    Serial.println(Udp.remotePort());

    // read the packet into packetBufffer
    Udp.read(packetBuffer,UDP_TX_PACKET_MAX_SIZE);
    Serial.println("Contents:");
    Serial.println(packetBuffer);
    
     
    // send a reply, to the IP address and port that sent us the packet we received
    Udp.beginPacket(Udp.remoteIP(), Udp.remotePort());
    Udp.write(ReplyBuffer);
    Udp.endPacket();
    for(int i=0; i<UDP_TX_PACKET_MAX_SIZE; i++)
      {
        packetBuffer[i] = '\0';
      }
  // feed the beasts
   fuettern();   
  }
  // poll the switch (pressed at least 3 seconds)
   delay(10);
   int buttonState = digitalRead(Taster);
   if (buttonState)
   {
     delay(3000);
     int buttonState = digitalRead(Taster);
     if (buttonState)
     {
      // feed the beasts
      fuettern();
     }
   }     
}

void fuettern(void) {
      // iterate over the notes of the melody:
      for (int thisNote = 0; thisNote < 8; thisNote++) {

      // to calculate the note duration, take one second 
      // divided by the note type.
      //e.g. quarter note = 1000 / 4, eighth note = 1000/8, etc.
      int noteDuration = 1000/noteDurations[thisNote];
      tone(5, melody[thisNote],noteDuration);

      // to distinguish the notes, set a minimum time between them.
      // the note's duration + 30% seems to work well:
      int pauseBetweenNotes = noteDuration * 1.30;
      delay(pauseBetweenNotes);
      // stop the tone playing:
      noTone(5);
      }  
      
      // set Relay on
      digitalWrite(Relay, LOW); // Relay on
      Serial.println("Relais an");
      delay(3000);
      digitalWrite(Relay, HIGH);  // Relay off
      Serial.println("Relais aus");

Arduino 19

WATERING SYSTEM - INTRODUCTION


Picture of WATERING SYSTEM - INTRODUCTION


To accomplish this project, you will need:

1 x Arduino UNO MEGA Duemilanove or Teensy 2.0 +
1 x LCD display with I2C communication
1 x RTC module with I2C communication
1 x Relay Module opto-coupled to 250V/10A
2 x Modules "Driver" LM-393 general purpose
1 x Soil Moisture Sensor (Hygrometer) KDQ11
1 x Water Level Sensor (Homemade)
1 x Buzzer piezoelectric
2 x LEDs - 10mm, Green
1 x LED - 10mm, Red
1 x LED - 10mm, Yellow
4 x Resistors 150 Ohm 1/4 W
1 x Water pump for aquarium, with filter system (127 or 220V)
1 x Electric Power Cable, 127/220VAC - 10Amps
1 x Socket 127/220VAC - 10 Amps


#include <Wire.h>
#include <LiquidCrystal_I2C.h>
#include "RTClib.h"


// frequency musical notes
#define NOTE_C6  1047
#define NOTE_C3  131
#define NOTE_G3  196

// pins definition
int levelSensorPin = 0;
int moistureSensorPin = 1;
int audioPin = 2;
int soggyLEDPin = 3;
int moistsoilLEDPin = 4;
int drysoilLEDPin = 5;
int pumpLEDPin = 6;
int pumpPin = 7;

// variables
int levelSensorValue;       // stores the level sensor values
int moistureSensorValue;    // stores the moisture sensor values
int j = 0;

// system messages
const char *string_table[] =
{   
  "     Welcome! =)",
  "   Tank LOW level",
  "      Dry soil",
  "     Moist soil",
  "     Soggy soil",
  "The water pump is on",
  "   ArduinoByMyself",
  "   Watering System",
  "    Please wait!"
};

// objects definition
RTC_DS1307 RTC;
LiquidCrystal_I2C lcd(0x27,20,4);


void setup(){
  // serial initialization
  Serial.begin(9600);
  
  // LCD initialization
  lcd.init();          
  lcd.backlight();     // with Backlight
  lcd.clear();         // clearscreen
  
  // Wire initialization
  Wire.begin();
  
  // RTC initialization
  RTC.begin();
  if (!RTC.isrunning()){
    // date and time adjust as the PC computer date and time
    RTC.adjust(DateTime(__DATE__, __TIME__)); 
  }
  
  // Arduino pins initalization
  pinMode(audioPin, OUTPUT);
  pinMode(soggyLEDPin, OUTPUT);
  pinMode(moistsoilLEDPin,OUTPUT);
  pinMode(drysoilLEDPin,OUTPUT);
  pinMode(pumpLEDPin,OUTPUT);
  pinMode(pumpPin,OUTPUT);
  
  // LCD initial messages
  lcd.clear();
  lcd.setCursor(0,0);
  lcd.print(string_table[6]); 
  lcd.setCursor(0,1);
  lcd.print(string_table[7]); 
  lcd.setCursor(0,3);
  lcd.print(string_table[0]); 
  // initialization delay
  delay(5000); 
}


void loop(){
  
  
  // RTC parameters definition
  DateTime myRTC = RTC.now();
  int H = myRTC.hour();
  int M = myRTC.minute();
  int S = myRTC.second();
  
  // call Clock Function
  //RightHour();
  
  // reads the sensors
  levelSensorValue = analogRead(levelSensorPin);
  moistureSensorValue = analogRead(moistureSensorPin);
  
  // if low water level: plays the low level alarm
  if(levelSensorValue > 600){
    // system messages
    lcd.clear();
    RightHour();
    lcd.setCursor(0,3);
    lcd.print(string_table[1]); 
    // plays the alarm sound
    for(int i=0;i<2;i++){
      tone(audioPin, NOTE_G3, 200);
      delay(200);
      tone(audioPin, NOTE_C3, 200);
      delay(200);
      noTone(audioPin);
    }
  }
  
  // check the moisture range
  if(moistureSensorValue >= 700){
    // in case of dry soil:
    // system messages
    lcd.clear();
    RightHour();
    lcd.setCursor(0,3);
    lcd.print(string_table[2]);
    // lights up the correct LED
    digitalWrite(drysoilLEDPin,HIGH);
    digitalWrite(moistsoilLEDPin,LOW);
    digitalWrite(soggyLEDPin,LOW);
    // plays the alarm sound
    tone(audioPin, NOTE_C6, 100);
    delay(250);
    noTone(audioPin);
  }
  if((moistureSensorValue < 700) && (moistureSensorValue >= 300)){
    // in case of moist soil:
    // system messages
    lcd.clear();
    RightHour();
    lcd.setCursor(0,3);
    lcd.print(string_table[3]);
    // lights up the correct LED
    digitalWrite(drysoilLEDPin,LOW);
    digitalWrite(moistsoilLEDPin,HIGH);
    digitalWrite(soggyLEDPin,LOW);
    delay(250);
  }
  if(moistureSensorValue < 300){
    // in case of soggy soil:
    // system messages
    lcd.clear();
    RightHour();
    lcd.setCursor(0,3);
    lcd.print(string_table[4]); 
    // lights up the correct LED
    digitalWrite(drysoilLEDPin,LOW);
    digitalWrite(moistsoilLEDPin,LOW);
    digitalWrite(soggyLEDPin,HIGH);
    delay(100);
  }
  
  // if the soil is dry and if it is the right time: turn on the pump for 1 minute
  if((H == 16) && (M == 50) && (S == 00)){
    while(moistureSensorValue >= 700){
      // system messages
      lcd.clear();
      RightHour();
      lcd.setCursor(0,1);
      lcd.print(string_table[8]);
      lcd.setCursor(0,3);
      lcd.print(string_table[5]);
      // turn the pump on
      digitalWrite(pumpPin,HIGH);
      digitalWrite(pumpLEDPin,HIGH);
      delay(10000);
      // if the soil is not moist so far
      // reads the moisture sensor once more
      moistureSensorValue = analogRead(moistureSensorPin);
    }
    // turn the pump off
    digitalWrite(pumpPin,LOW);
    digitalWrite(pumpLEDPin,LOW);
  }
  
}

// Real Time Clock Function
void RightHour()
{
  DateTime Now = RTC.now();
  String clock_date = "  Date: ";
  String clock_hour = "   Time: ";
  
  int _day = Now.day();
  int _month = Now.month();
  int _year = Now.year();
  
  clock_date += fixZero(_day);
  clock_date += "/";
  clock_date += fixZero(_month);
  clock_date += "/";
  clock_date += _year;
  
  int _hour = Now.hour();
  int _minute = Now.minute();
  int _second = Now.second();
  
  clock_hour += fixZero(_hour);
  clock_hour += ":";
  clock_hour += fixZero(_minute);
  clock_hour += ":";
  clock_hour += fixZero(_second);
  
  lcd.clear();
  lcd.setCursor(0, 0);
  lcd.print(clock_date);
  lcd.setCursor(0, 1);
  lcd.print(clock_hour);
  
  delay(500);
}


String fixZero(int i)
{
  String ret;
  if (i < 10) ret += "0";
  ret += i;
  return ret;
}

Internet of Things (IoT)

Internet of Things หรือ IoT Internet of Things (IoT)  คือ การที่อุปกรณ์อิเล็กทรอนิกส์ต่างๆ สามารถเชื่อมโยงหรือส่งข้อมูลถึงกันได้ด้วยอิน...